TABLE
OF Contents
Accessories
2
Optional
Hand Piece Drawer
2
Materials Integrity
2
Cautions
3
Safety Notes on Temperature
3-4
Operating
Instructions
4-6
Maintenance/Service
6
Error
Codes
7
Biological
testing
8
Warranty
9-10
Parts
List/Order Form
11
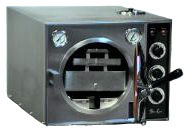
Accessories
The
Cox sterilizer comes equipped with one drawer, the removable
basket for the drawer, a tool for changing baskets and a
cooling rack upon which to place the hot baskets. Depending
on the size of your practice, you may wish to purchase additional
baskets and drawers. Also included are an instrument rack,
and a mesh basket (burr holder) for sterilizing small/lightweight
items.
Optional
Hand Piece Drawer
An optional
drawer is available which is ideal for heat processing hand
pieces. The drawer is designed to channel the sterilizers
airflow into the hand pieces air and water lines (see pages
4 & 5 for hand piece sterilization instructions).
To
order the drawer (P/N H-18-100CS) call Alfa at 800-762-1586.
Material Integrity
Tests have
been conducted on various surgical and dental instruments
as to compatibility with the 375 degree F (190 C) temperatures.
Generally, medical and dental stainless and carbon steel
hand instruments are safe in the Cox sterilizer. Caution
should be used with plastic and rubber goods. When in doubt,
consult the instrument manufacturer.
Cautions
Ø
Use only a properly grounded and fuse outlet (110V 60 cycle
or a 220/240V 50 cycle). A separate circuit is recommended.
Ø
During operation, the exterior surface of the sterilizer
remains comfortable to the touch; however the interior of
the drawer and the sterilized instruments will be hot. Use
only the handle to carry the drawer. Optional Cooling Rack
is available. To order (P/N PCOX001) call Alfa at 800-762-1586.
Ø
The sterilizer is designed for use with metal instruments.
While many new plastics, Teflon and rubber products can
be used in a high temperature environment, extreme care
should be used in sterilizing these materials until compatibility
has been confirmed.
Ø
When sterilizing packaged instruments, use only dry heat
packaging material suitable for 375 degrees F (190 C) temperatures.
Ø
Instruments that have been wiped with alcohol must
be allowed to dry before being placed in the sterilizer.
Safety Notes Concerning Temperature
The temperature
in the Cox sterilizer is controlled by computer logic, which
precisely maintains temperature throughout the sterilization
chamber. The temperature control is extremely sensitive
and maintains 375 degrees F (190 C).
After room
temperature instruments are placed in the sterilizer, the
temperature may drop a few degrees depending on the size
of the load. If the temperature drops below 372 degrees
F (189 C), the cycle will not begin until 375 degrees F
(190 C) has been re-established.
During warm
up, the temperature read out will not display in the temperature
window until 260 degrees F (127 C) has been reached.
It is important for the drawer to be in
the sterilizer at all times during operation, otherwise
the heating element will continually operate to compensate
for the lower temperature caused by room temperature air
entering the sterilizer.
Do not open
the drawer during a sterilization cycle. Also, do not add
an instrument during a cycle, as it may not be sterilized.
Operating Instructions
At The Start
Of The Day Before turning
the sterilizer on, remove the drawer and visually inspect
the chamber. Re-insert the drawer into the sterilizer and
push and release the
ON STANBY/OFF button and allow the sterilizer
to heat to 375 degrees F (190 C). This will take about 9
minutes.
The temperature
read out will begin at 260 degrees F (127 C).
Note: When
pressing the sterilizer buttons, do not hold them down for
any length of time as this will lead to an E-12 Error Code
(see Error Codes section).
The sterilizer
is very energy efficient and should be left on all day,
as its electrical consumption is minimal.
Before beginning
a sterilization cycle, be sure instruments are clean and
free of gross debris. (For information about which instruments
can be safely sterilized, see Materials Integrity page
2).
To Sterilize
Instruments,
which are to be sterilized in Cycles I and II, need not
to be dried prior to placing them in the sterilizer, however
instruments which are packaged for Cycle III must be dried
before packaging.
Instruments
that have been placed in a holding, ultrasonic, or cold
chemical disinfectant solution must be thoroughly rinsed
before sterilization.
Failure to
thoroughly remove extraneous agents prior to sterilization
could lead to surface staining of instruments.
Cycle
I 6 Minutes
To sterilize
unwrapped instruments, place them in the drawer, insert
the drawer in the sterilizer then push and release the Cycle
I button.
Be sure to
place burrs, diamonds and other small items in the accessory
mesh basket. At the end of 6 minutes, a beep will sound
and a 6 C will appear in the time window on the face of
the sterilizer indicating the cycle has been completed.
Immediately
after removing the drawer with the sterilized instruments, remove the hot basket from the drawer and place
it on the cooling rack using the basket removal tool. The
basket containing the sterilized instruments may continue
to cool on the cooling rack.
Cycle
II 8 Minutes
Hand Piece
Sterilization Instructions
To sterilize
air rotor hand pieces or medical drills with internal tubing,
the following protocol should be used:
Ø
Clean the hand piece (flush water lines by running the hand
piece for 30 seconds); thoroughly scrub with detergent and
water to remove adherent material. Remove old lubricant
and debris from turbine head by spaying a hand piece cleaner/solvent
into the air drive. Do not use a cleaner/lubricant.
Ø
Place thoroughly clean hand pieces in the drawer.
Note:
If the optional hand piece drawer has been purchased, it
can b
used
in lieu of the standard drawer. Simply lay the hand pieces
in the mesh notches in the drawer and fit the connecter
end of the hand piece onto the circular opening at the end
of the drawer.
To sterilize
hand pieces, select Cycle II. When the beeps sounds and
a 8C appears in the time window at the end of 8 minutes,
promptly remove and cool the instruments and insert the
drawer with the other basket into the sterilizer. Remember
to lubricate the hand piece prior to use.
The End Of
The Day
Push and
release the ON STANDBY/OFF button. The sterilizer will go
into standby mode while the cooling fan operates for 10
minutes.
At the end
of ten minutes, the sterilizer will automatically shut off.
If the sterilizer is connected to a wall outlet controlled
on/off switch, do not turn the switch off or in any way
disrupt the power supply while the sterilizer is in cool
down mode.
Maintenance Service
The Cox sterilizer
is designed for minimum maintenance and easy service. It
is constructed of high quality stainless steal which may
be cleaned with any non abrasive stainless steel leaner
and can be externally disinfected with the disinfected of
your choice.
All of the
common components used in the sterilizers construction
are long life, heavy-duty parts that require no maintenance.
If anything needs to be replaced, an authorized service
representative should be called or call Alfa at 800-762-1586.
Error Codes
Any failure
in performance will be signaled by an error code.
If one of
the following error codes appear, unplug the sterilizer,
wait several seconds and then plug it back in. This will
re-establish the error detect logic and will eliminate false
error codes that may occur. If the error code persists,
call your authorized service representative or Alfa Medical.
Process Failures:
E-12
Temperature
Probe:
E-21
Heater Drive:
E-30
E-31
Biological Testing
The American
Dental Association, United States Air Force, Joint Commission
of Accreditation of Hospitals, and the Centers for Disease
Control recommend biological indicator tests to verify to
sterilizers performance.
For
monitoring dry heat, biological indicators containing bacillus
subtilis should be used. Spore strips, as well as test services
are widely available through universities and commercial
services. To order any of these items, call Alfa at 800-762-1586.
The
following spore strip is recommended:
1.
Weigh the spore strip envelope
with a jumbo paper clip.
Note: Be careful not to puncture the envelope.
2.
Place the weighted strip in
the drawer.
3.
With the sterilizer operating
at 375 degrees F (190 C) place the drawer containing the
spore strip in the sterilizer.
4.
Start the test cycle by staring
Cycle I, II, or III.
5.
When the beep sounds, remove
the spore strip for culturing.
Warranty Policy
I.
Cox Sterilizers Inc. (hereafter Cox) hereby warrants all Cox Rapid Dry
Heat Transfer Sterilizers and accessories thereto (collectively
the product) supplied by Cox to be freed from defects, whether
material and/or workmanship, under normal use, until one
year after date of purchase from Cox by the initial customer,
provided the product has been used with all of any instructions
furnished in respect of the product.
Notwithstanding the foregoing, this warranty applies
only if:
a)
The defective product is received
back, transportation prepaid, no later than 1 year after
date of purchase from Cox by the initial customer. Proof
of purchase must be supplied: otherwise, manufacturing date
will be used to determine warranty period.
b)
Cox agrees that if there is
a defect, and that such defect, in the opinion of Cox, has
not been caused by misuse, abuse or accident. Wrong voltage,
alterations, use of components not supplied by Cox, damage
which occurred during transportation beyond original transportation
to the initial customer and
-
c)
The serial number of the defective
product, or the product from which a defective component
has been taken, has not been altered, defaced or removed.
II.
Coxs only obligation if the foregoing warranty does apply
is to repair or replace defective material and/or workmanship,
and therefore all other expenses whatsoever, including but
not limited to, transportation and installation expenses,
are not the responsibility of Cox. For clarity, the only
labor expense Cox will pay to fix any defect covered by
this warranty is labor performed by Cox and its facility.
III.
The foregoing warranty is exclusive
and is in lieu of all other warranties (whether written,
oral or implied, but not limited to all
Warranties of description, quality, merchantability
and fitness for any particular purpose) and Cox shall not
be liable for incidental exemplary and/or consequential
damages, including, but not limited to, loss of profits.
IV.
No agent, employee or representative
of Cox has any authority to bind Cox to any representation
or warranty relating to any product other than as specifically
provided in this warranty.